How I Built an Expense Tracker App for Myself
I've always been particular about tracking where my money goes. But every expense tracker I tried was either bloated with features I didn't need, required a sign-up, or wanted to sync my bank accounts. And the biggest problem — after making a UPI payment through Google Pay, I'd always forget to log the expense.
So I built my own — with OCR receipt scanning and notification-based expense marking baked in.
The Vision
A personal finance app that's:
- Offline-first — no accounts, no cloud, no subscriptions
- Fast — log an expense in under 5 seconds
- Smart — scan a GPay receipt screenshot and auto-fill the expense
- Integrated — pay via UPI and mark as paid/failed from the notification bar
Tech Stack
| Layer | Technology |
|---|---|
| Framework | React Native CLI 0.83.1 (bare, no Expo) |
| Language | TypeScript |
| Navigation | React Navigation (native-stack + bottom-tabs) |
| State Management | React Context + useReducer |
| Persistence | AsyncStorage |
| UI Library | React Native Paper (Material Design 3) |
| Charts | react-native-gifted-charts |
| OCR | @react-native-ml-kit/text-recognition |
| Lists | @shopify/flash-list |
| Animations | react-native-reanimated |
| PDF Export | react-native-html-to-pdf |
| Native Modules | Custom Android UPI + Share bridge |
I chose bare React Native CLI over Expo deliberately because I needed full native module access for the UPI payment bridge and notification actions — things that require writing custom Java/Kotlin code.
Application Flows
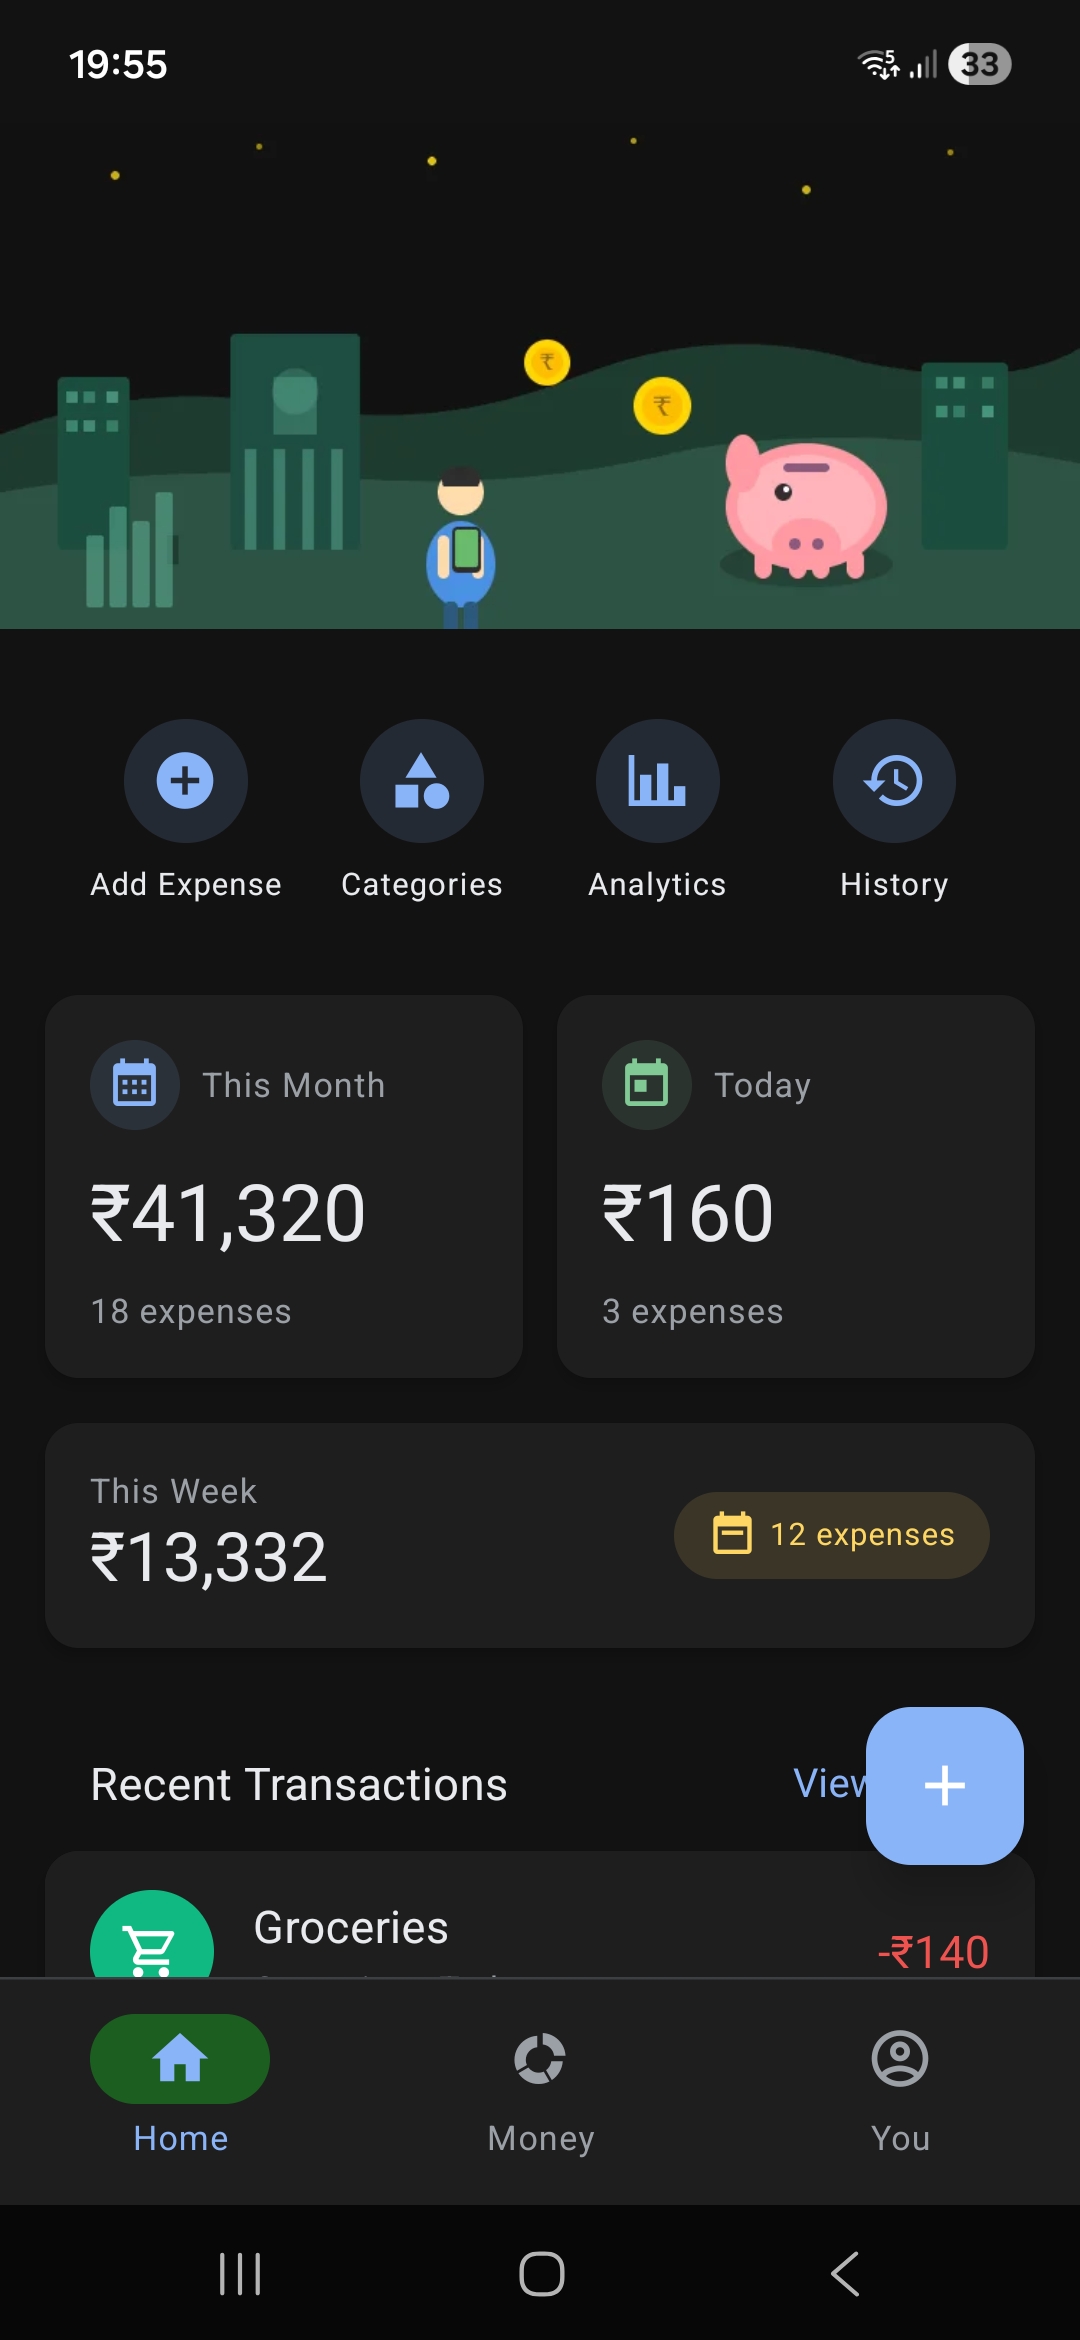
1. Manual Expense Entry
The simplest flow: tap the FAB → enter amount → pick category → add note → choose payment method → Mark as Paid. The expense is saved to AsyncStorage instantly.
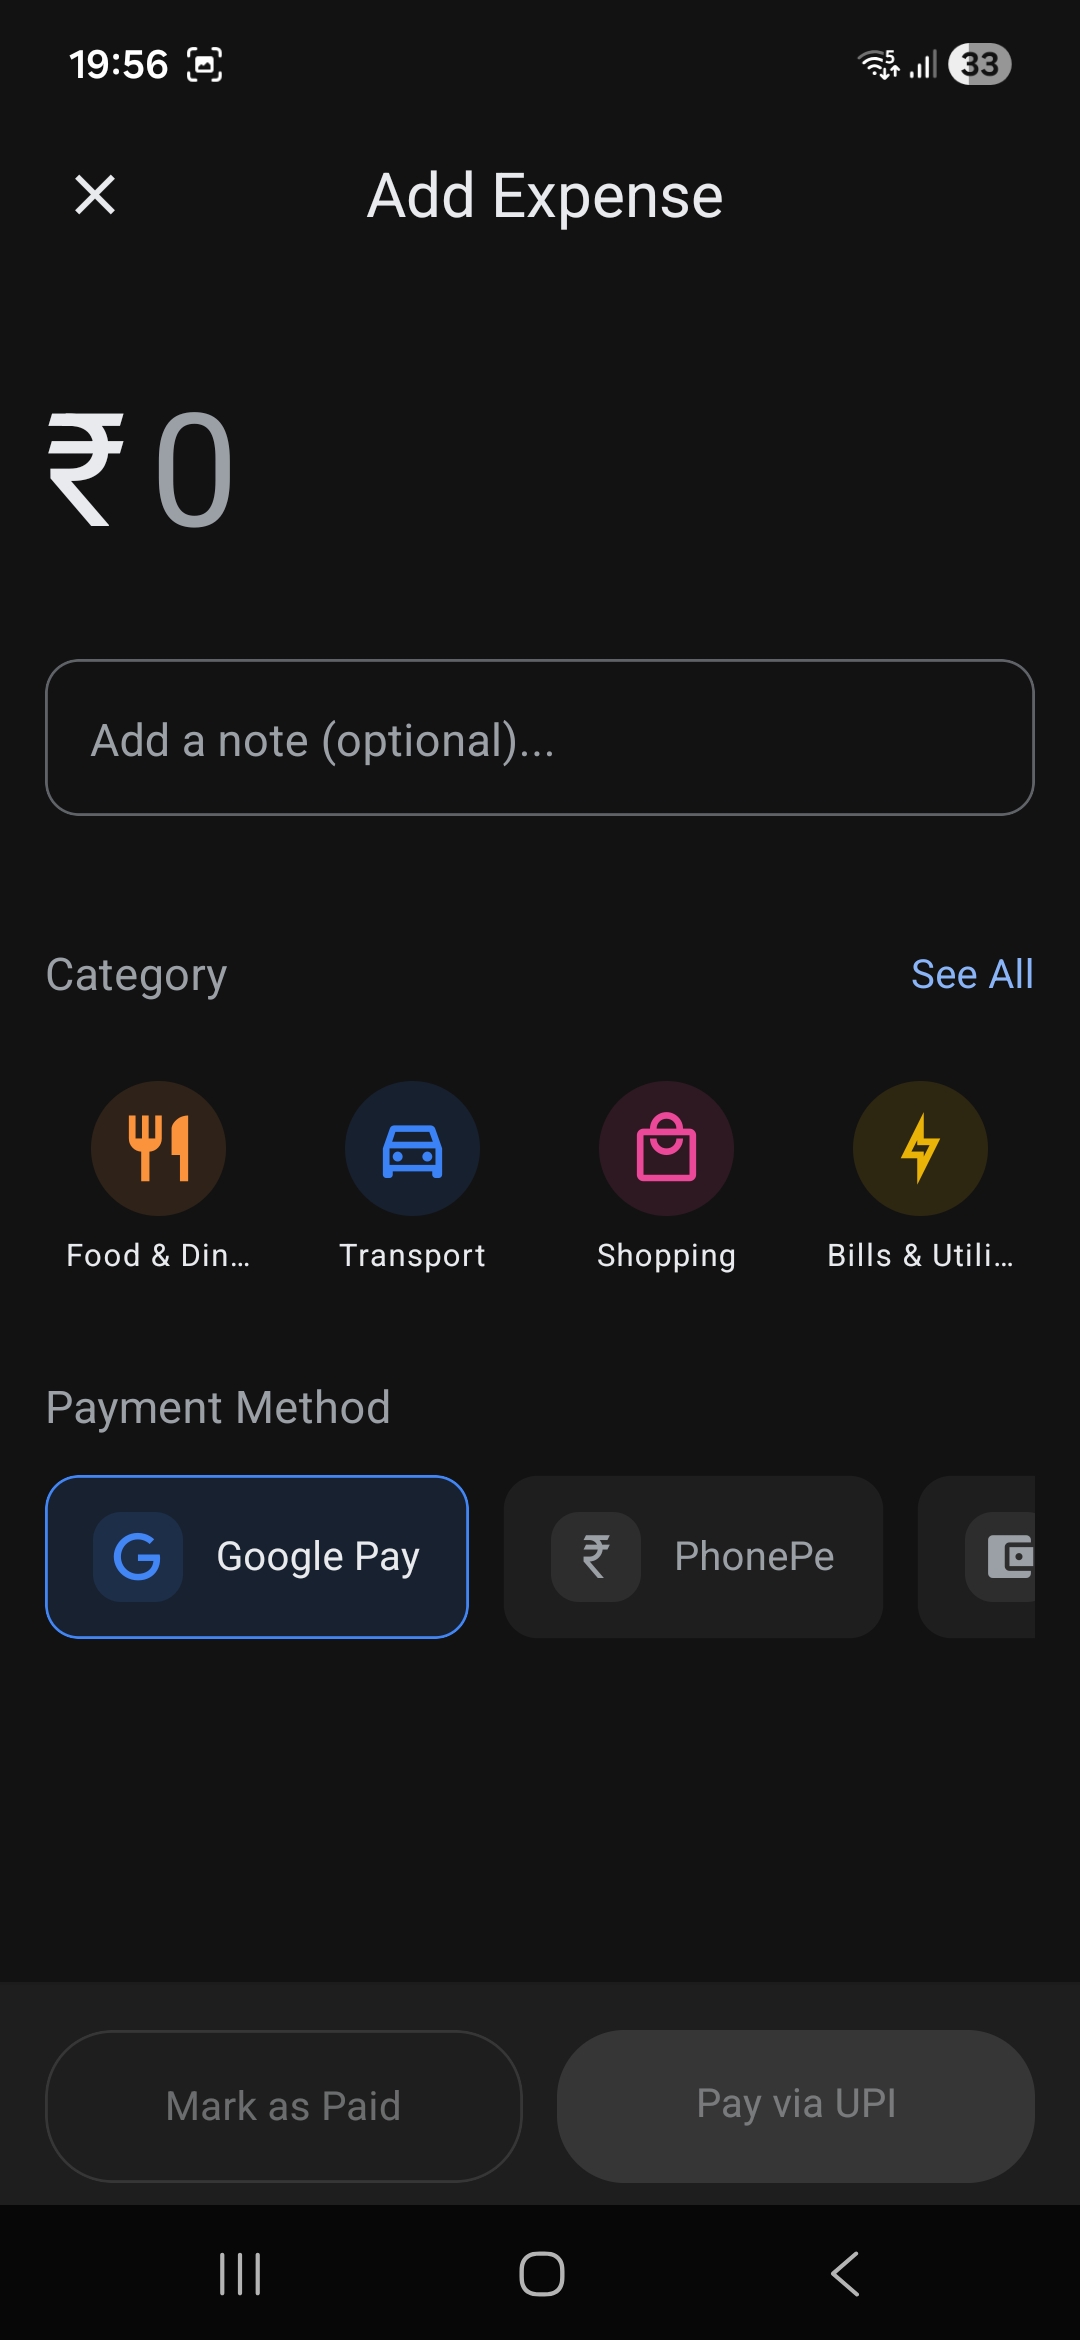
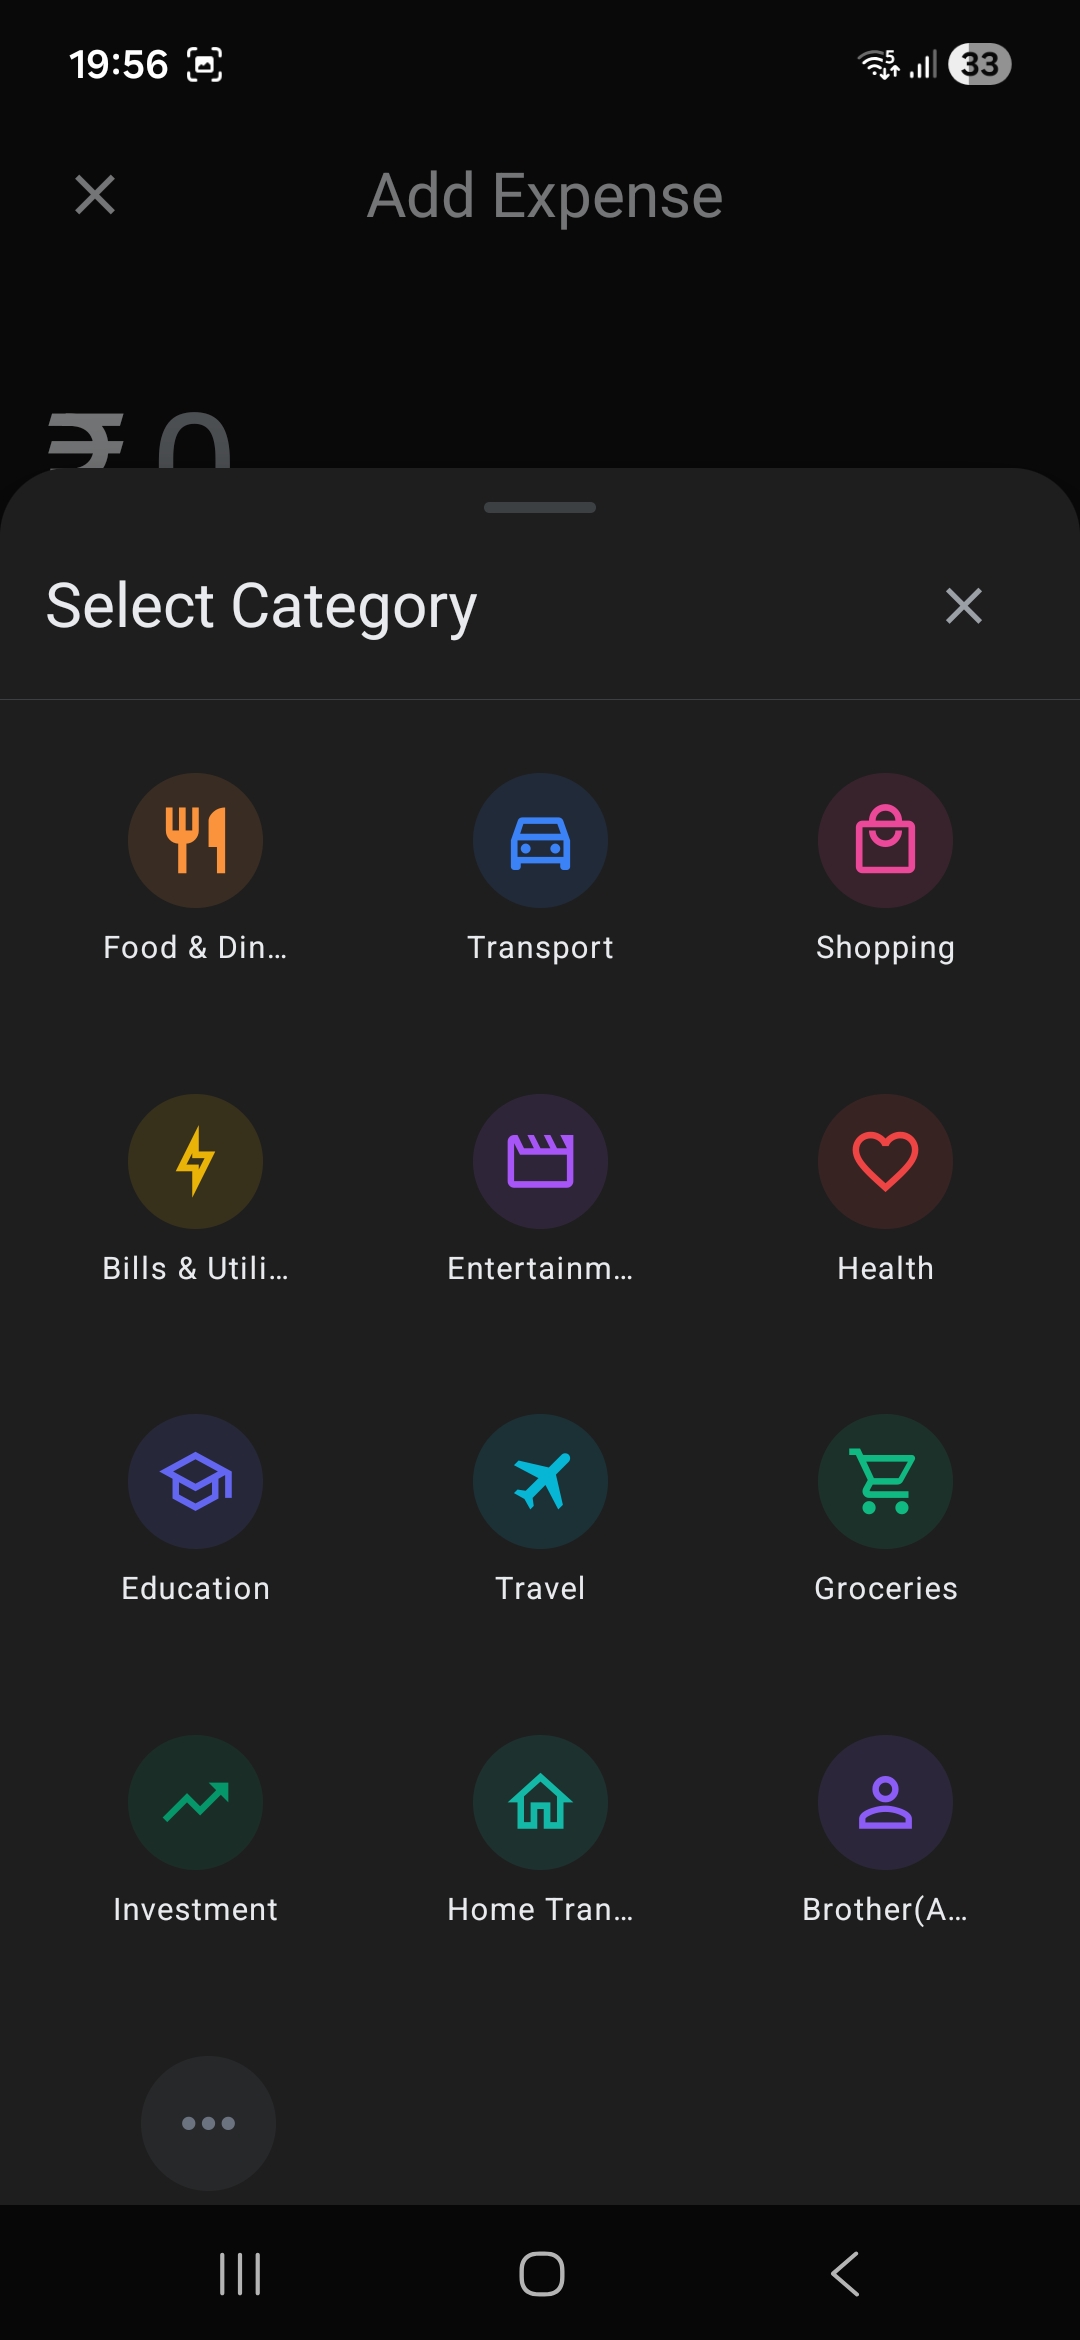
Categories can be selected quickly from the horizontal list, or browse the full list via the "See All" modal with curated color-coded icons.
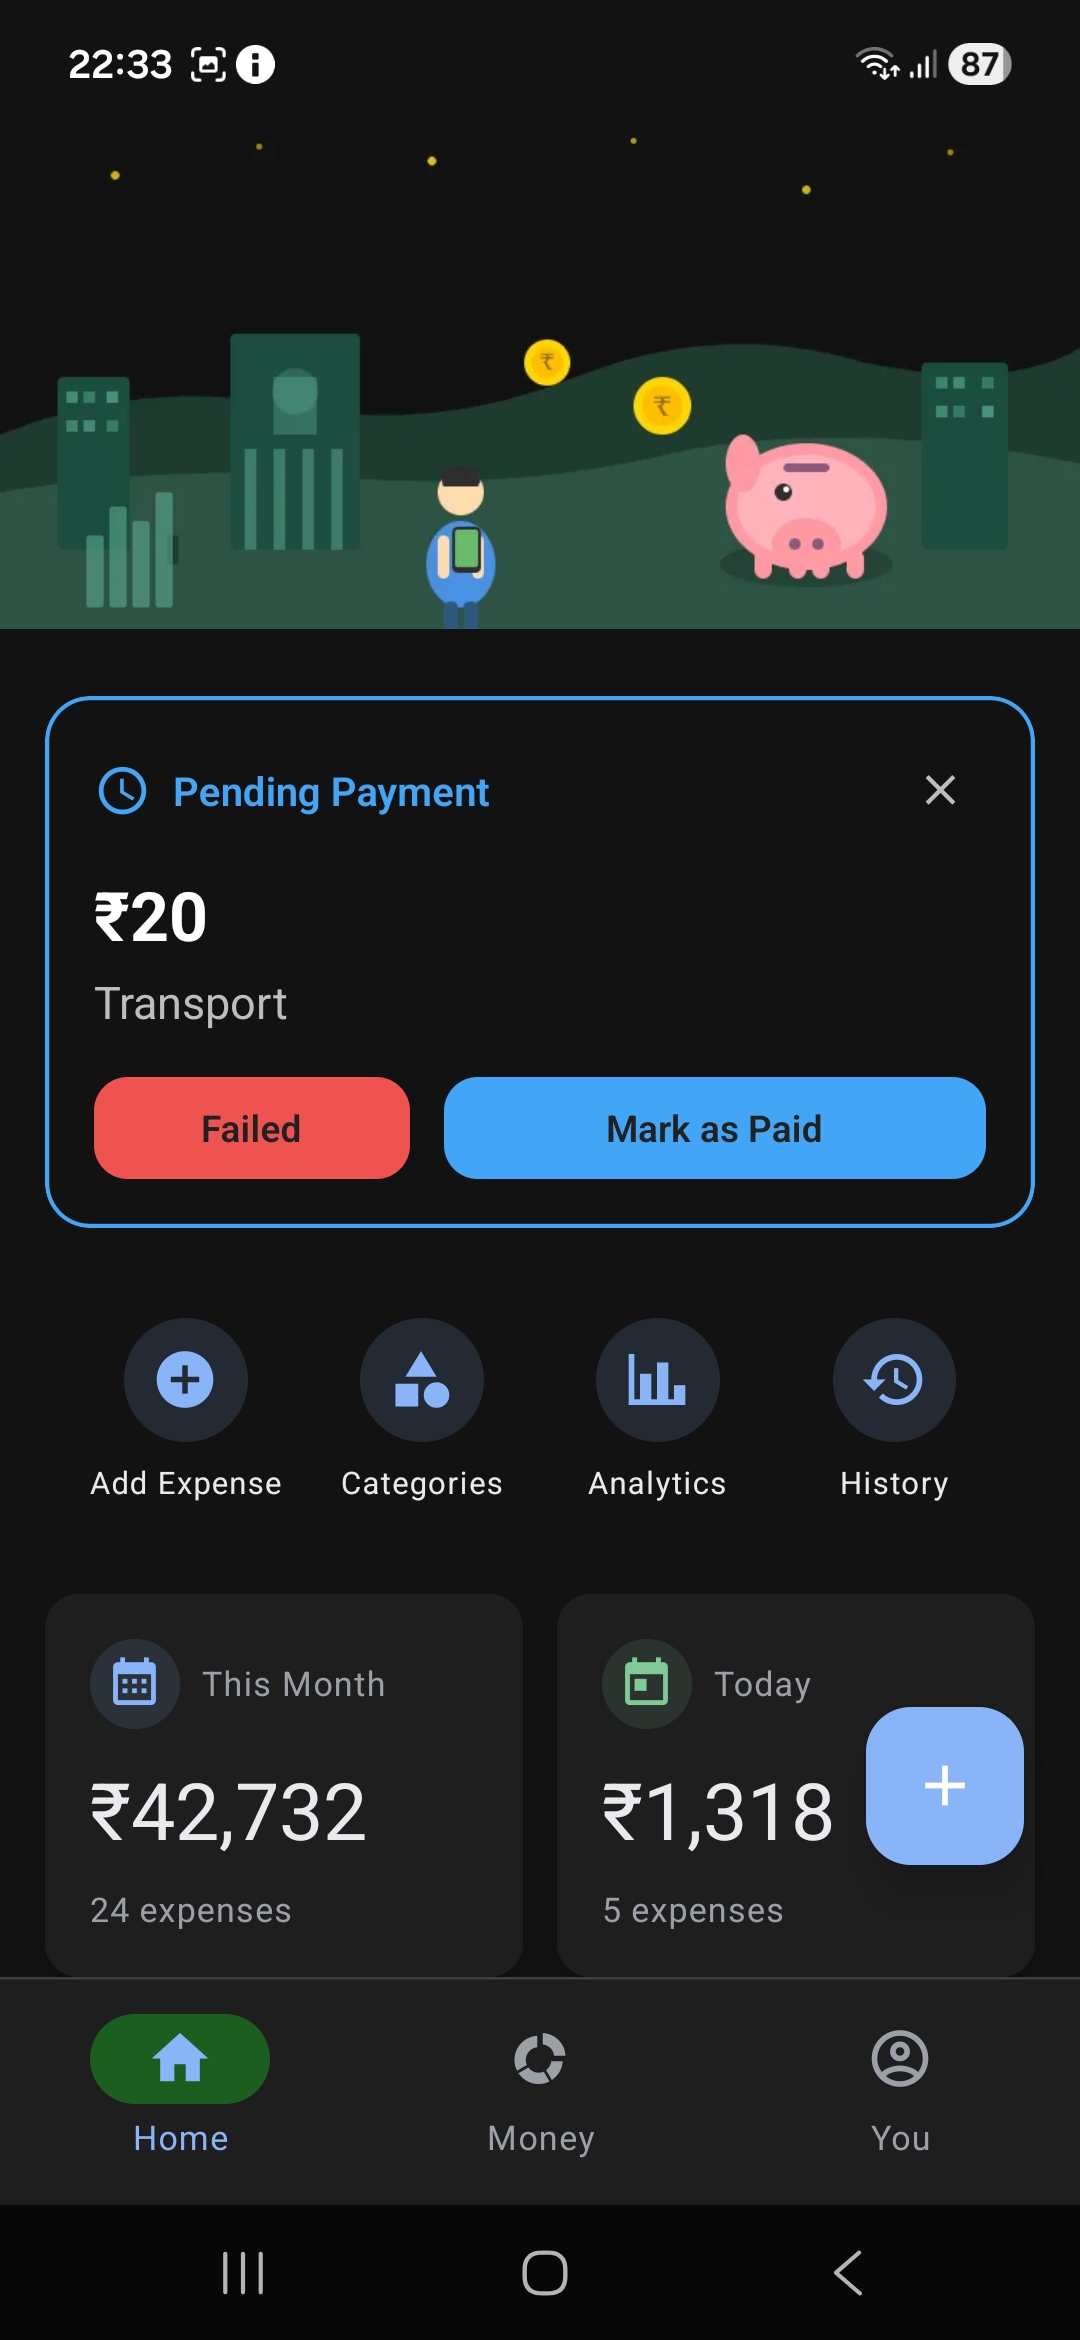
2. UPI Payment Flow with Notification Actions
This is the flow I'm most proud of:
- User fills expense details and taps Pay via UPI
- App creates a
PendingExpenseand persists it to AsyncStorage - Native Android module constructs a
upi://payintent and launches the UPI app (GPay, PhonePe, Paytm, etc.) - Simultaneously, a persistent notification appears with Paid and Failed action buttons
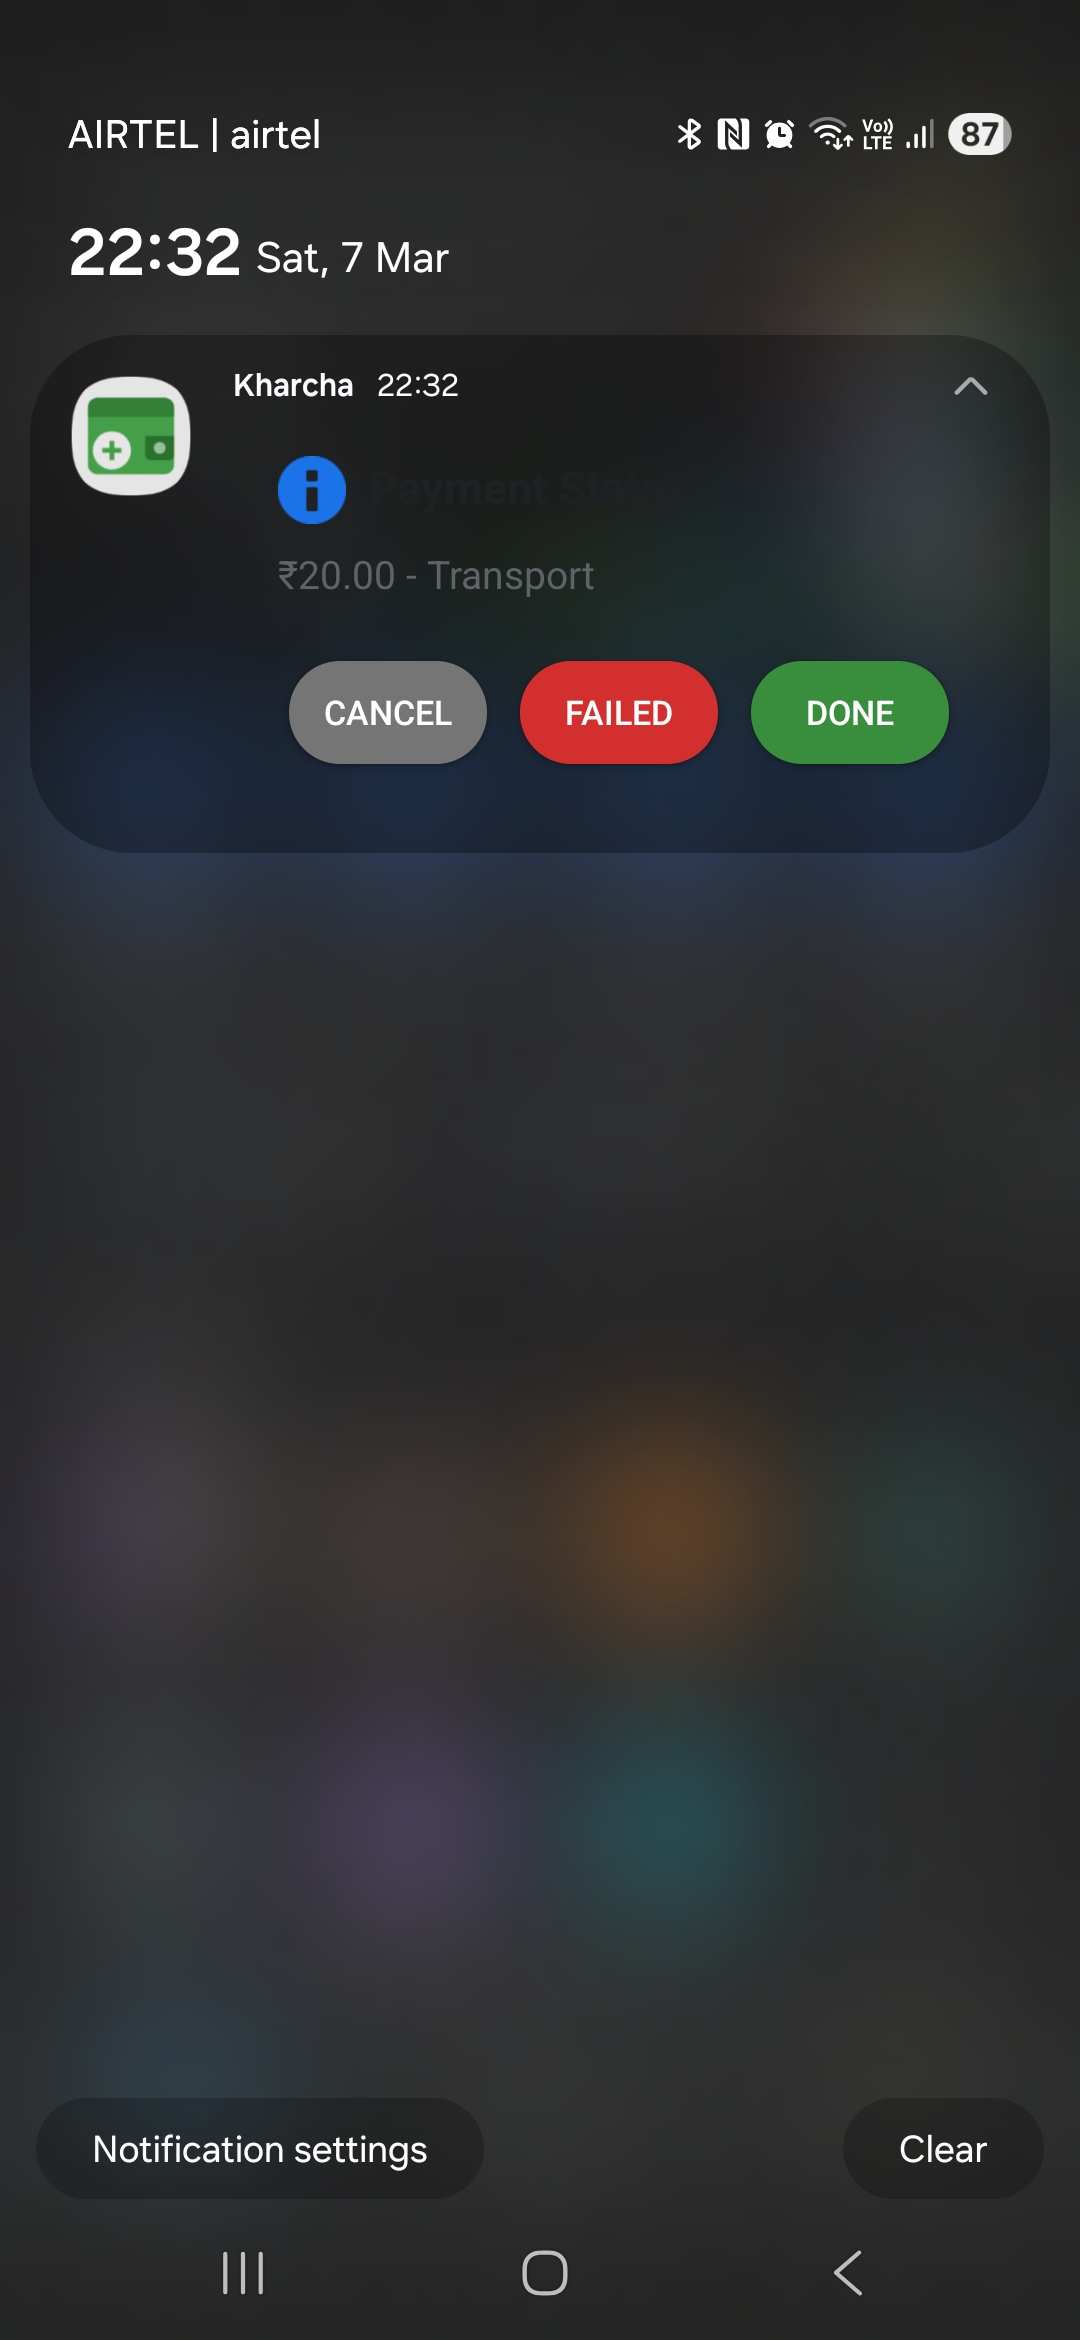
- After completing payment in the UPI app, user taps Paid on the notification → expense is marked as completed
- If the app was killed during payment, the
resumePendingExpense()service checks for stale pending expenses on next launch
The native UPI module bridges JavaScript ↔ Android:
export const launchUPIPayment = async (
    upiUri: string,
    expenseId: string,
    amount: number,
    description: string
): Promise<UPILaunchResult> => {
    return UPIPaymentModule.launchUPI(upiUri, expenseId, amount, description);
};
The notification actions (Paid/Failed) are handled natively and emit events back to JS via NativeEventEmitter:
export const subscribeToPaymentStatus = (
    callback: (event: PaymentStatusEvent) => void
): (() => void) => {
    const emitter = getEventEmitter();
    const subscription = emitter.addListener('onPaymentStatusUpdate', callback);
    return () => subscription.remove();
};
3. OCR Receipt Scanning (Share Intent)
Take a screenshot of your GPay/UPI transaction receipt → share it to Expense Tracker → the app runs ML Kit OCR and auto-fills the expense form.
The ReceiptService uses a multi-pattern parser optimized for GPay receipts:
- Amount extraction: Handles
₹20,₹2,051,Rs. 500, standalone numbers, and "Amount:" labels — with 5 fallback patterns - Receiver extraction: Parses "To RAJU VADEWALE" and "Paid to" patterns
- Note extraction: Finds the user-added message chip between amount and date (e.g., "poha")
- Date extraction: Parses "27 Jan 2026, 10:13 am" format with AM/PM conversion
const handleSharedImage = async (uri: string) => {
const details = await ReceiptService.parseReceipt(uri);
navigationRef.current.navigate('AddExpense', {
prefilledAmount: details.amount,
prefilledDescription: details.description,
receiptImage: uri,
});
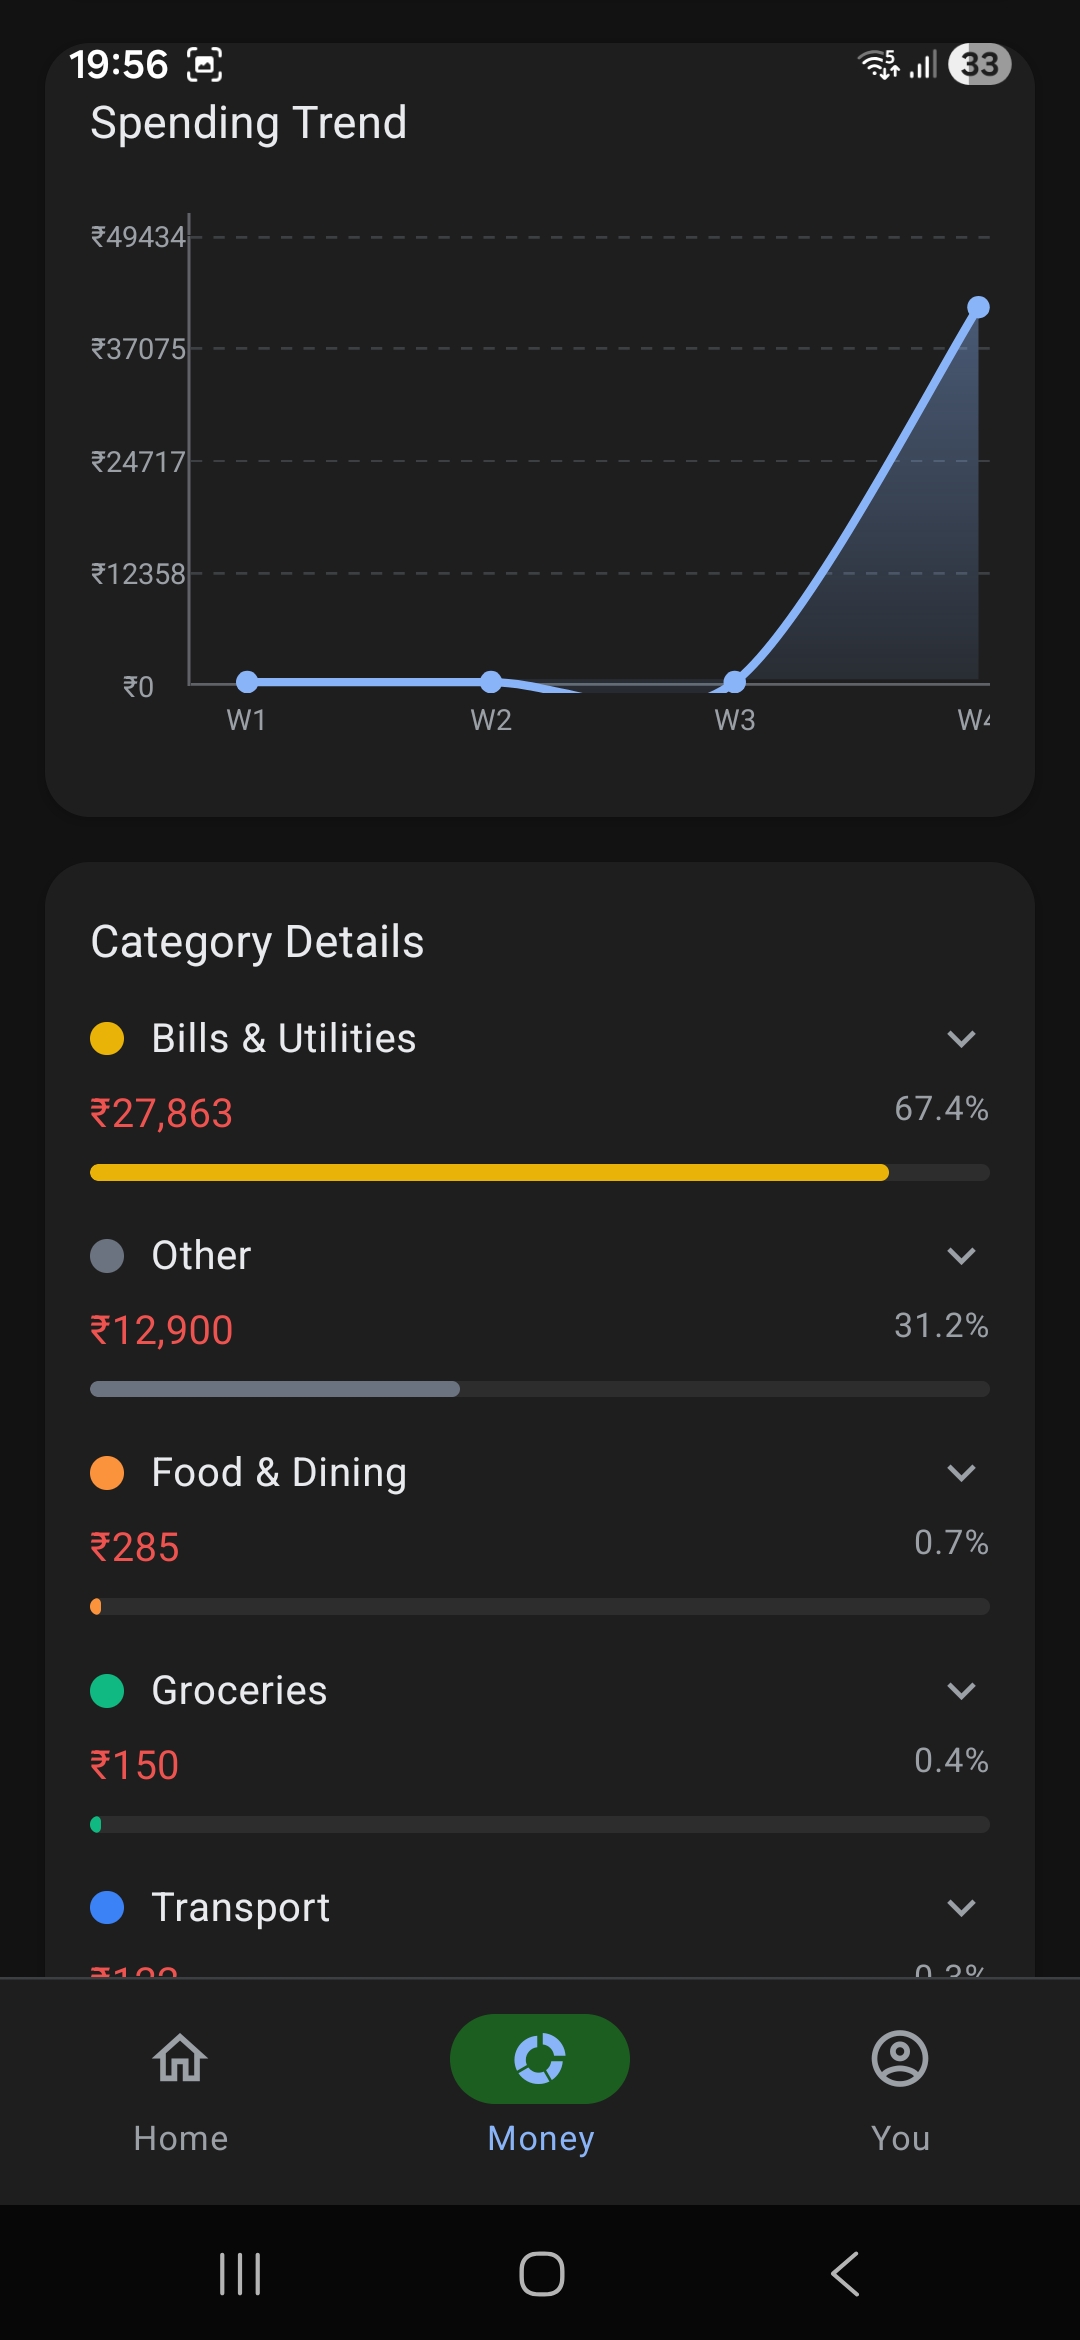
};4. Analytics Dashboard
The analytics screen provides a comprehensive spending overview with multiple visualizations:
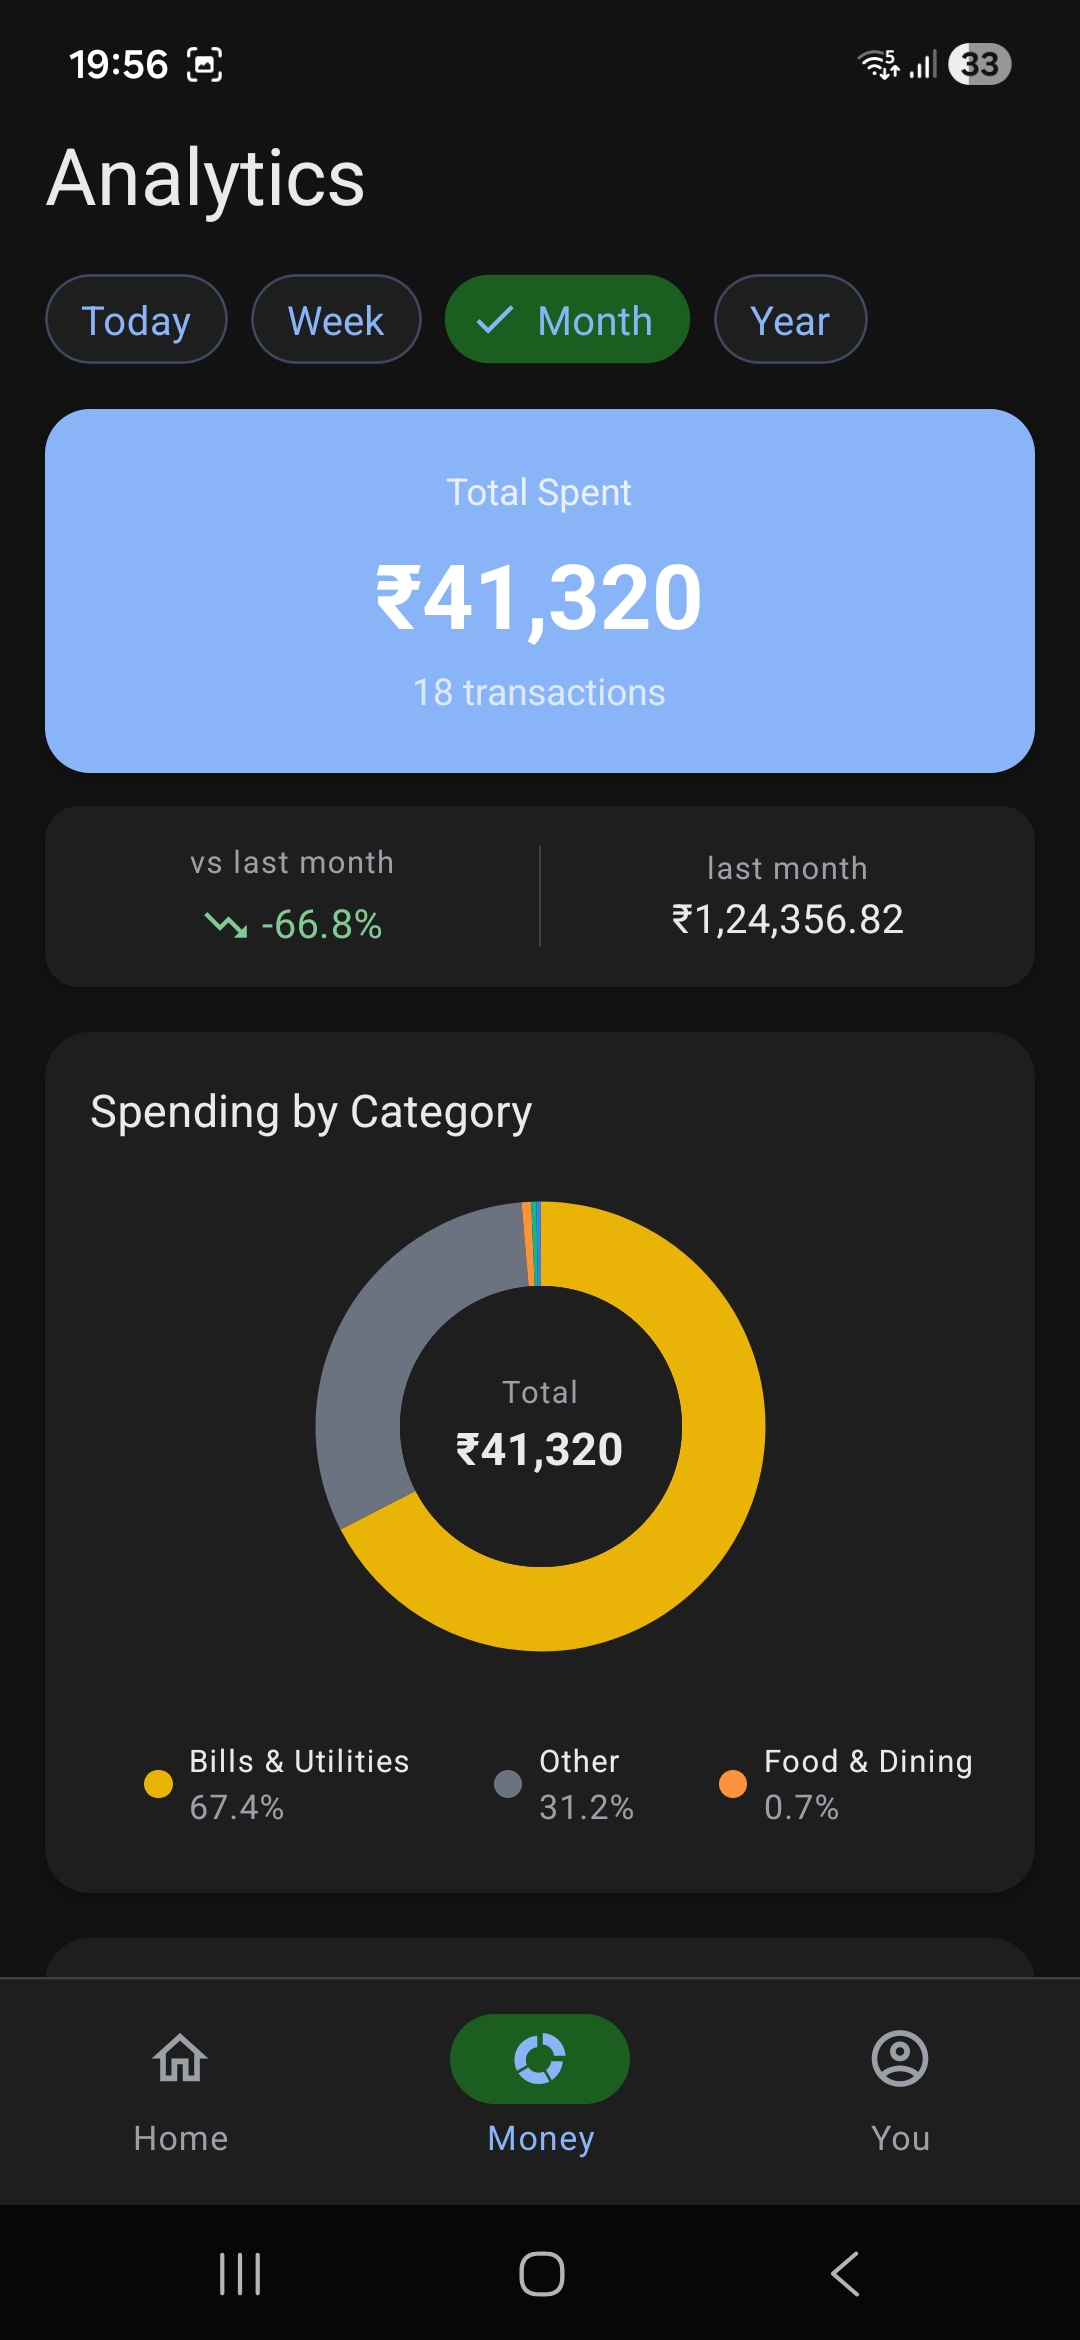
- Time-range filters: Today / Week / Month / Year
- Summary card: Total spent with transaction count
- Comparison card: Current vs. previous period with percentage change
- Donut chart: Category-wise spending breakdown with interactive segments
- Expandable categories: Tap a category to see individual transactions
5. Category Management
Create, edit, and delete custom categories with MaterialCommunityIcons and a curated 8-color palette.
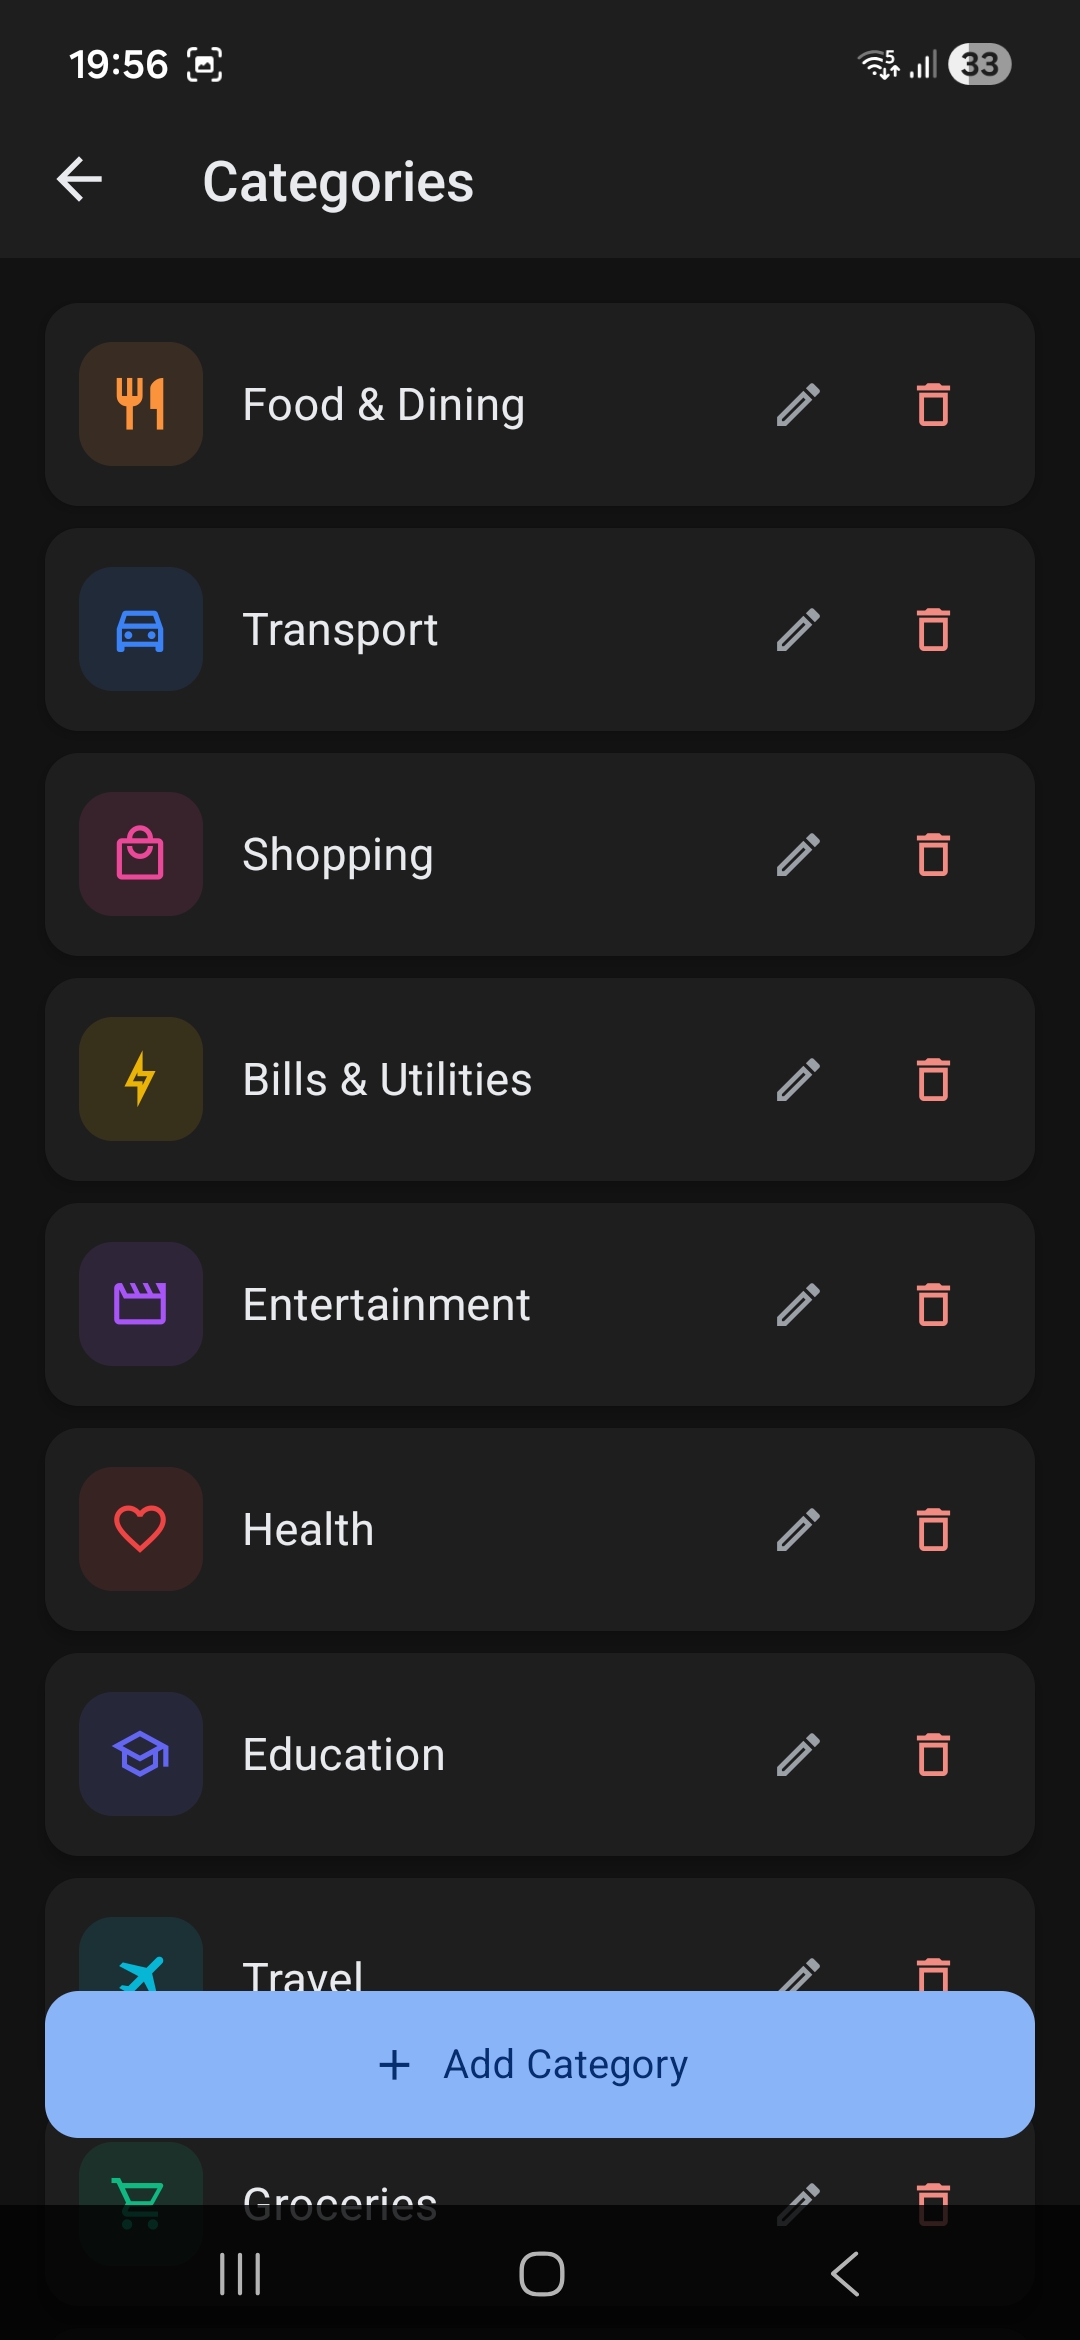
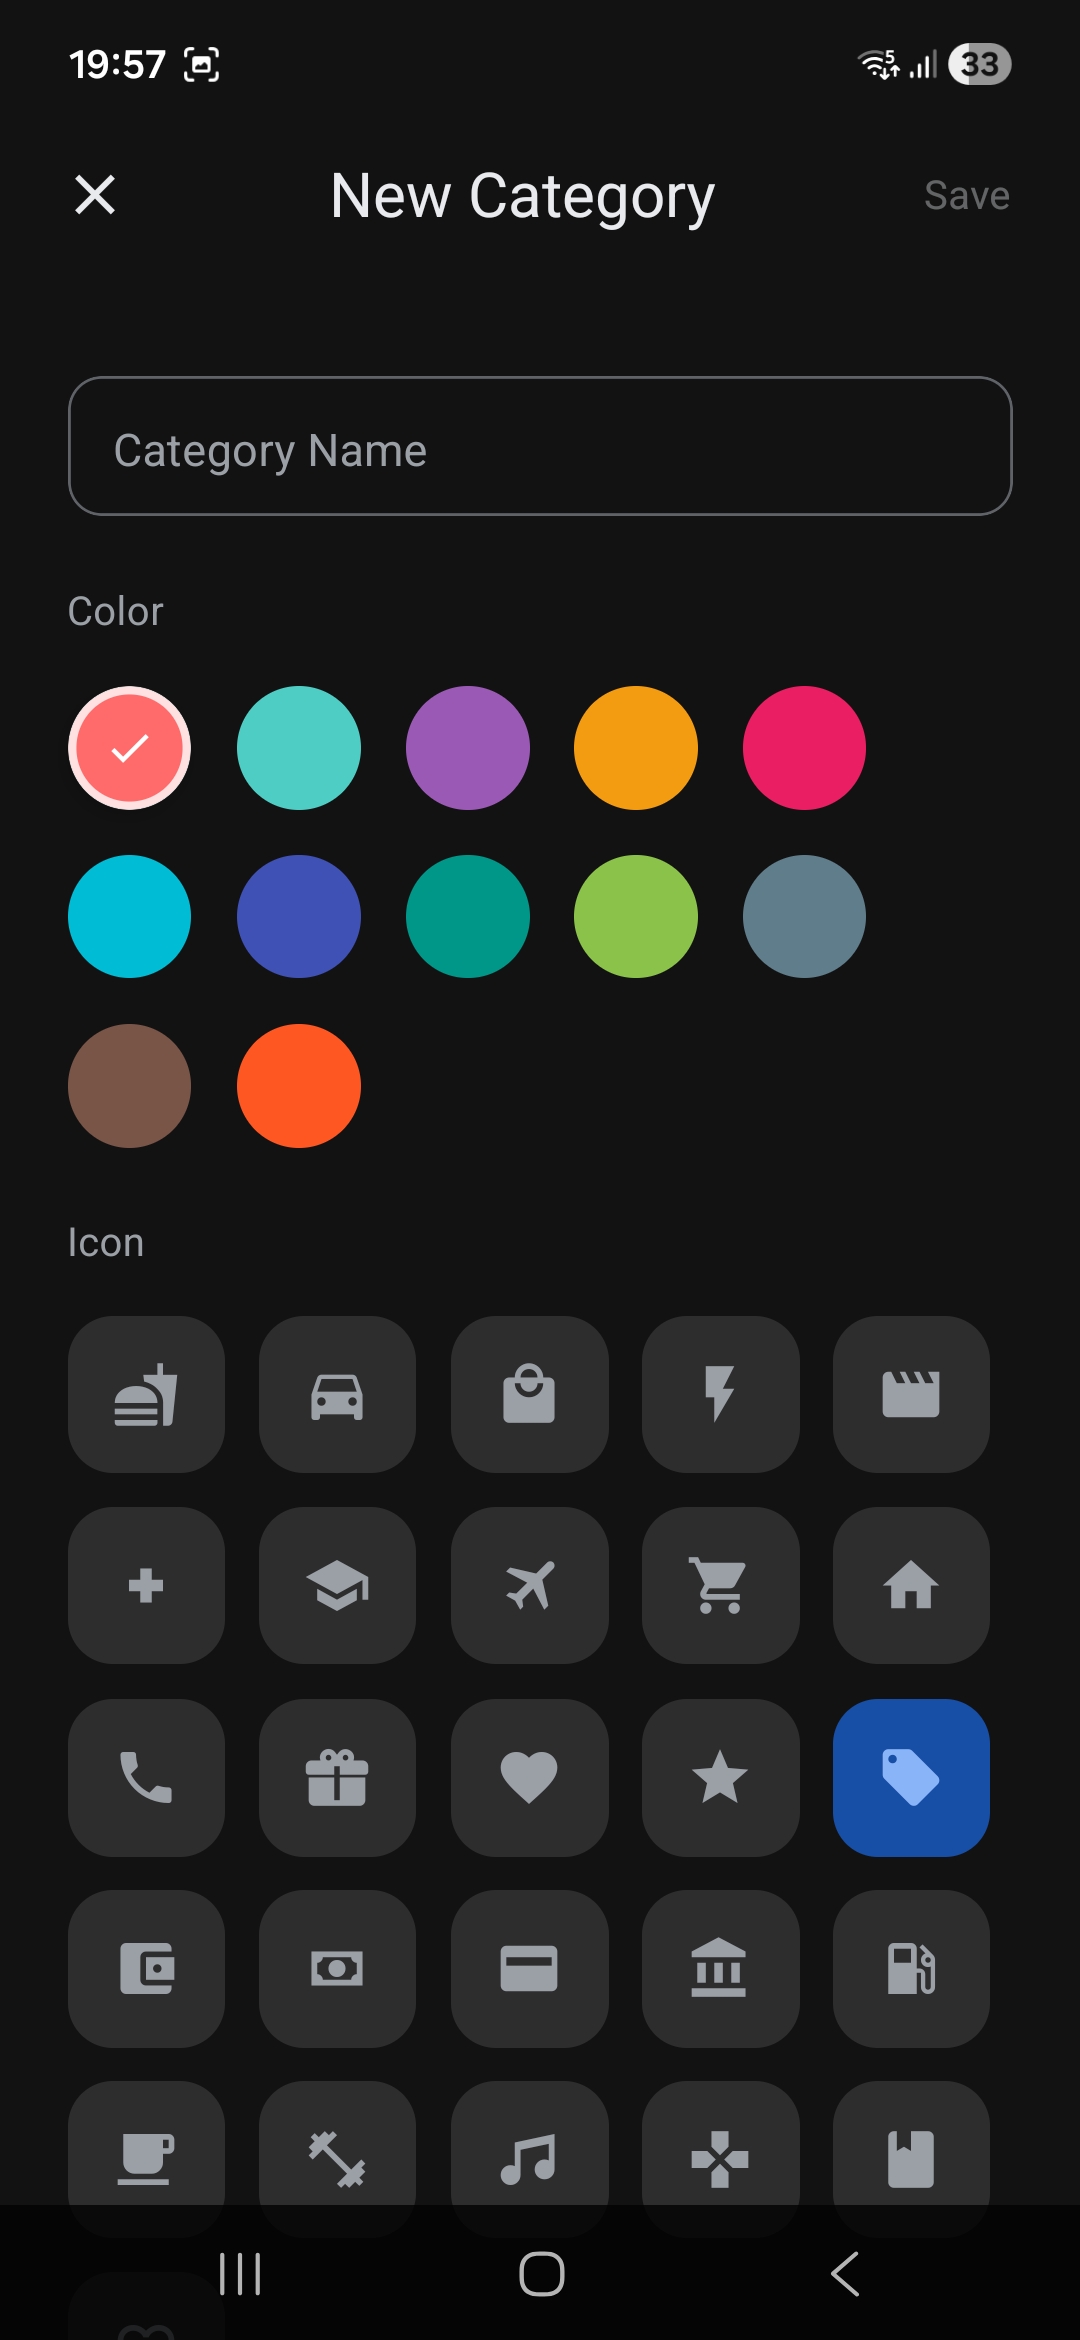
Default categories: Food & Dining, Transport, Shopping, Bills & Utilities, Entertainment — each with a unique color and icon.
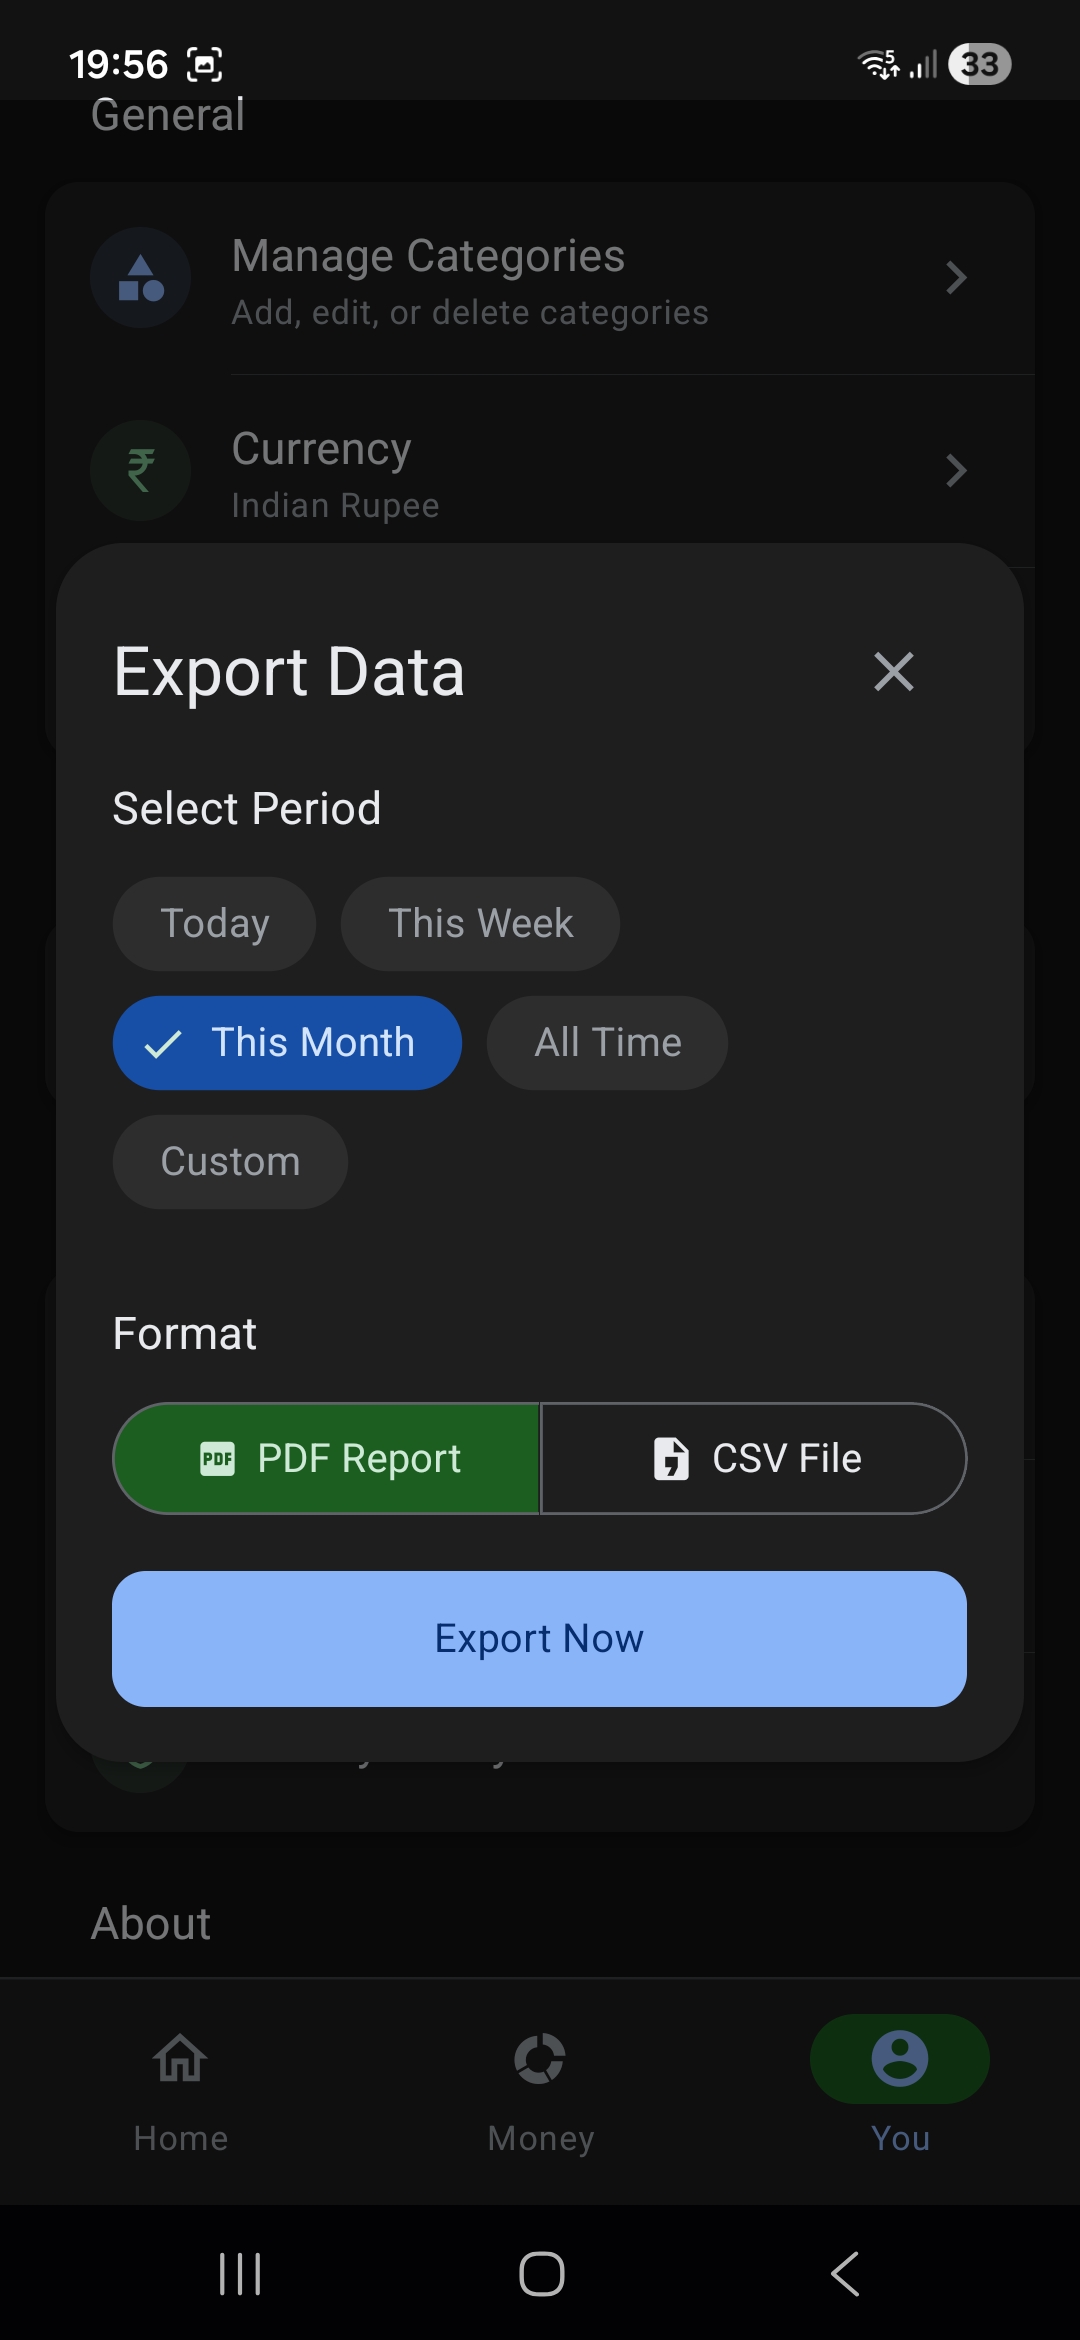
6. Data Export (CSV & PDF)
Export your expense data for external record-keeping or tax filing. The export service generates:
- CSV: Standard comma-separated format with all expense fields
- PDF: Styled HTML report converted via
react-native-html-to-pdf, shared through the native share sheet
7. Settings & Preferences
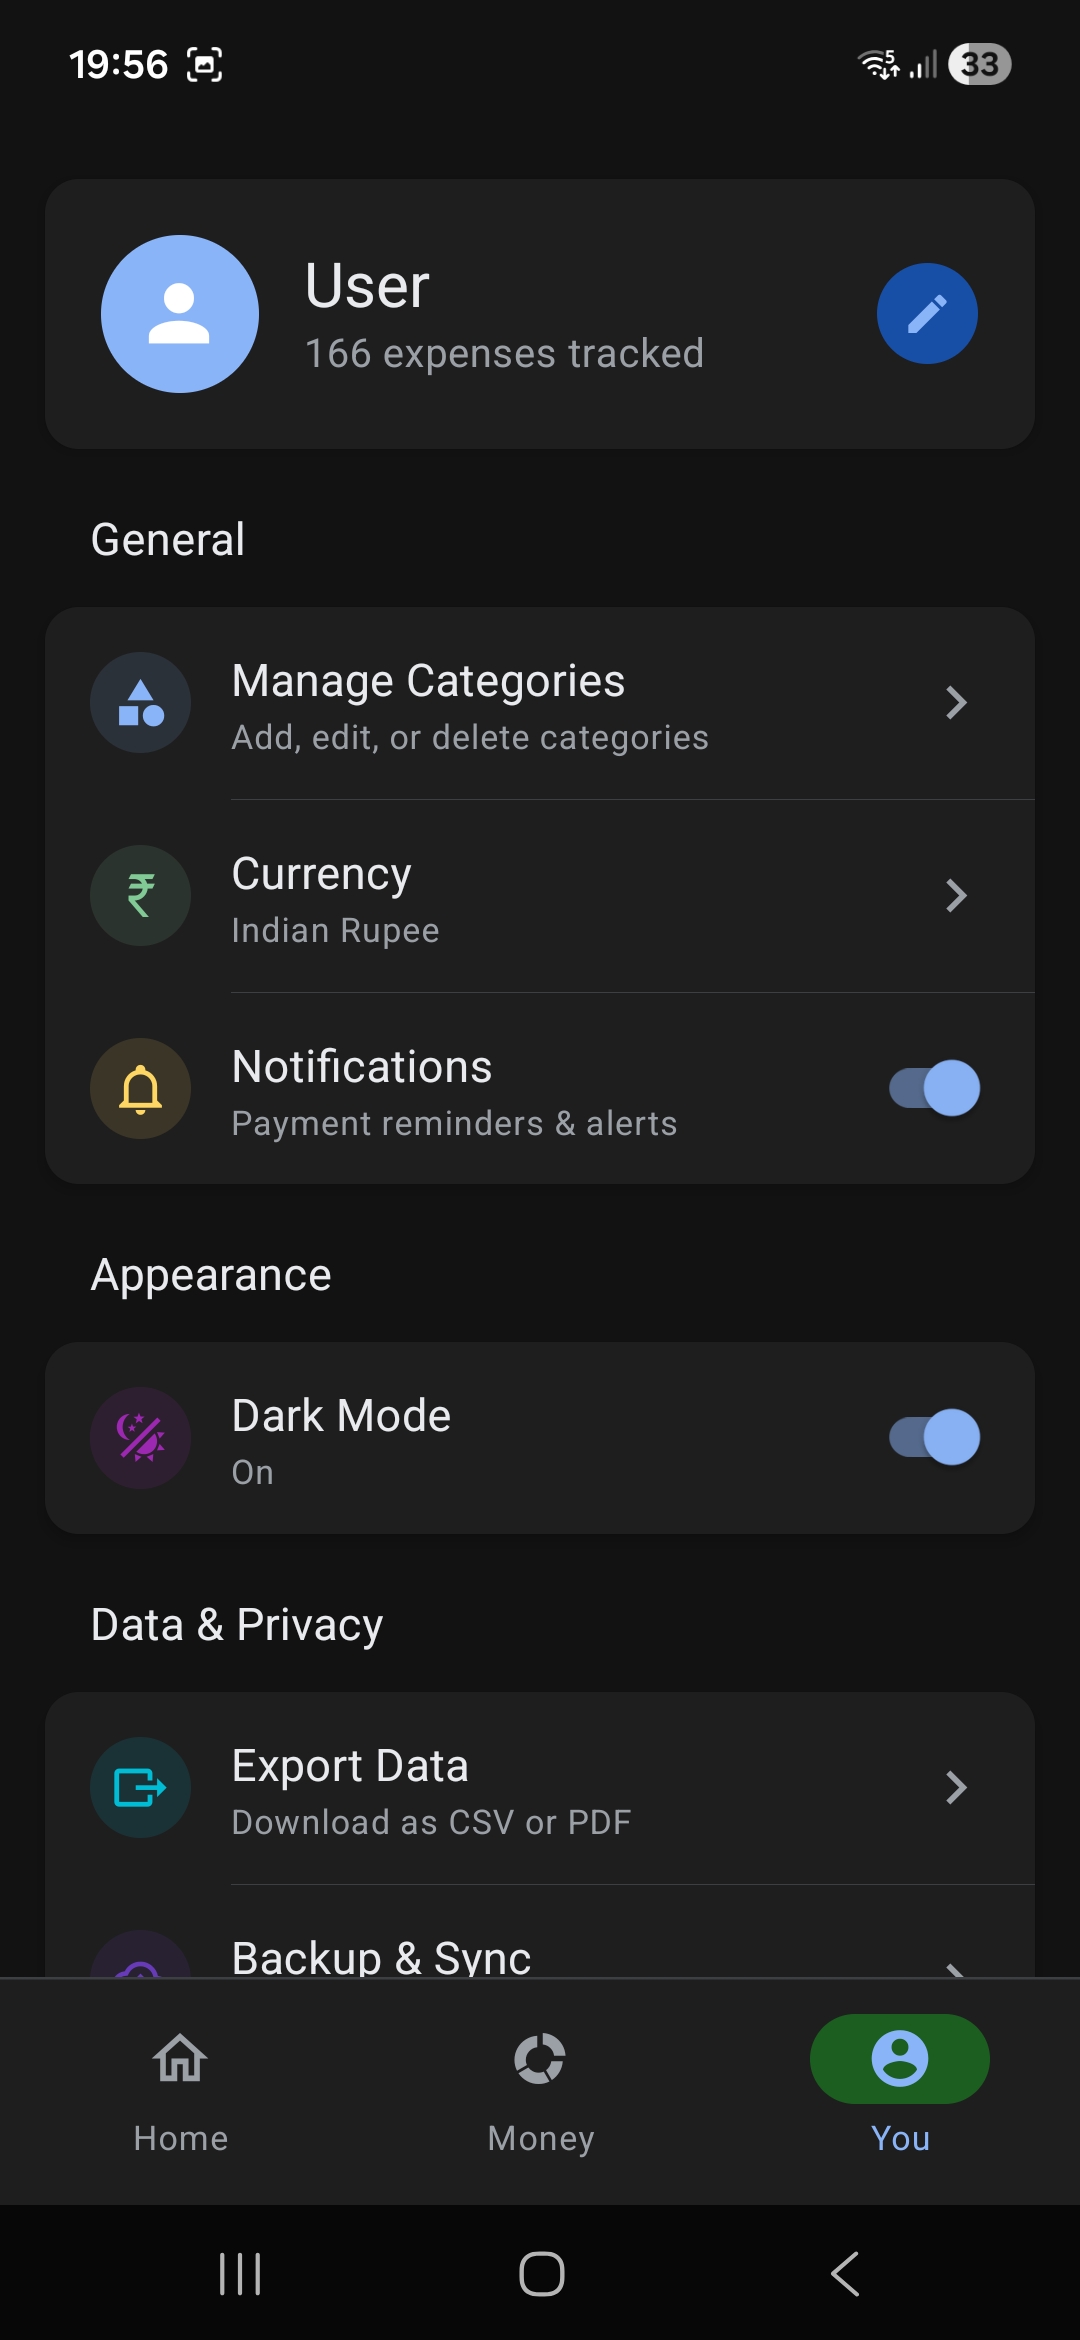
- Manage Categories (navigate to category management)
- Currency selection (INR default)
- Dark/Light mode toggle
- Export data (CSV/PDF)
- Backup & Sync (future feature)
8. Transaction History
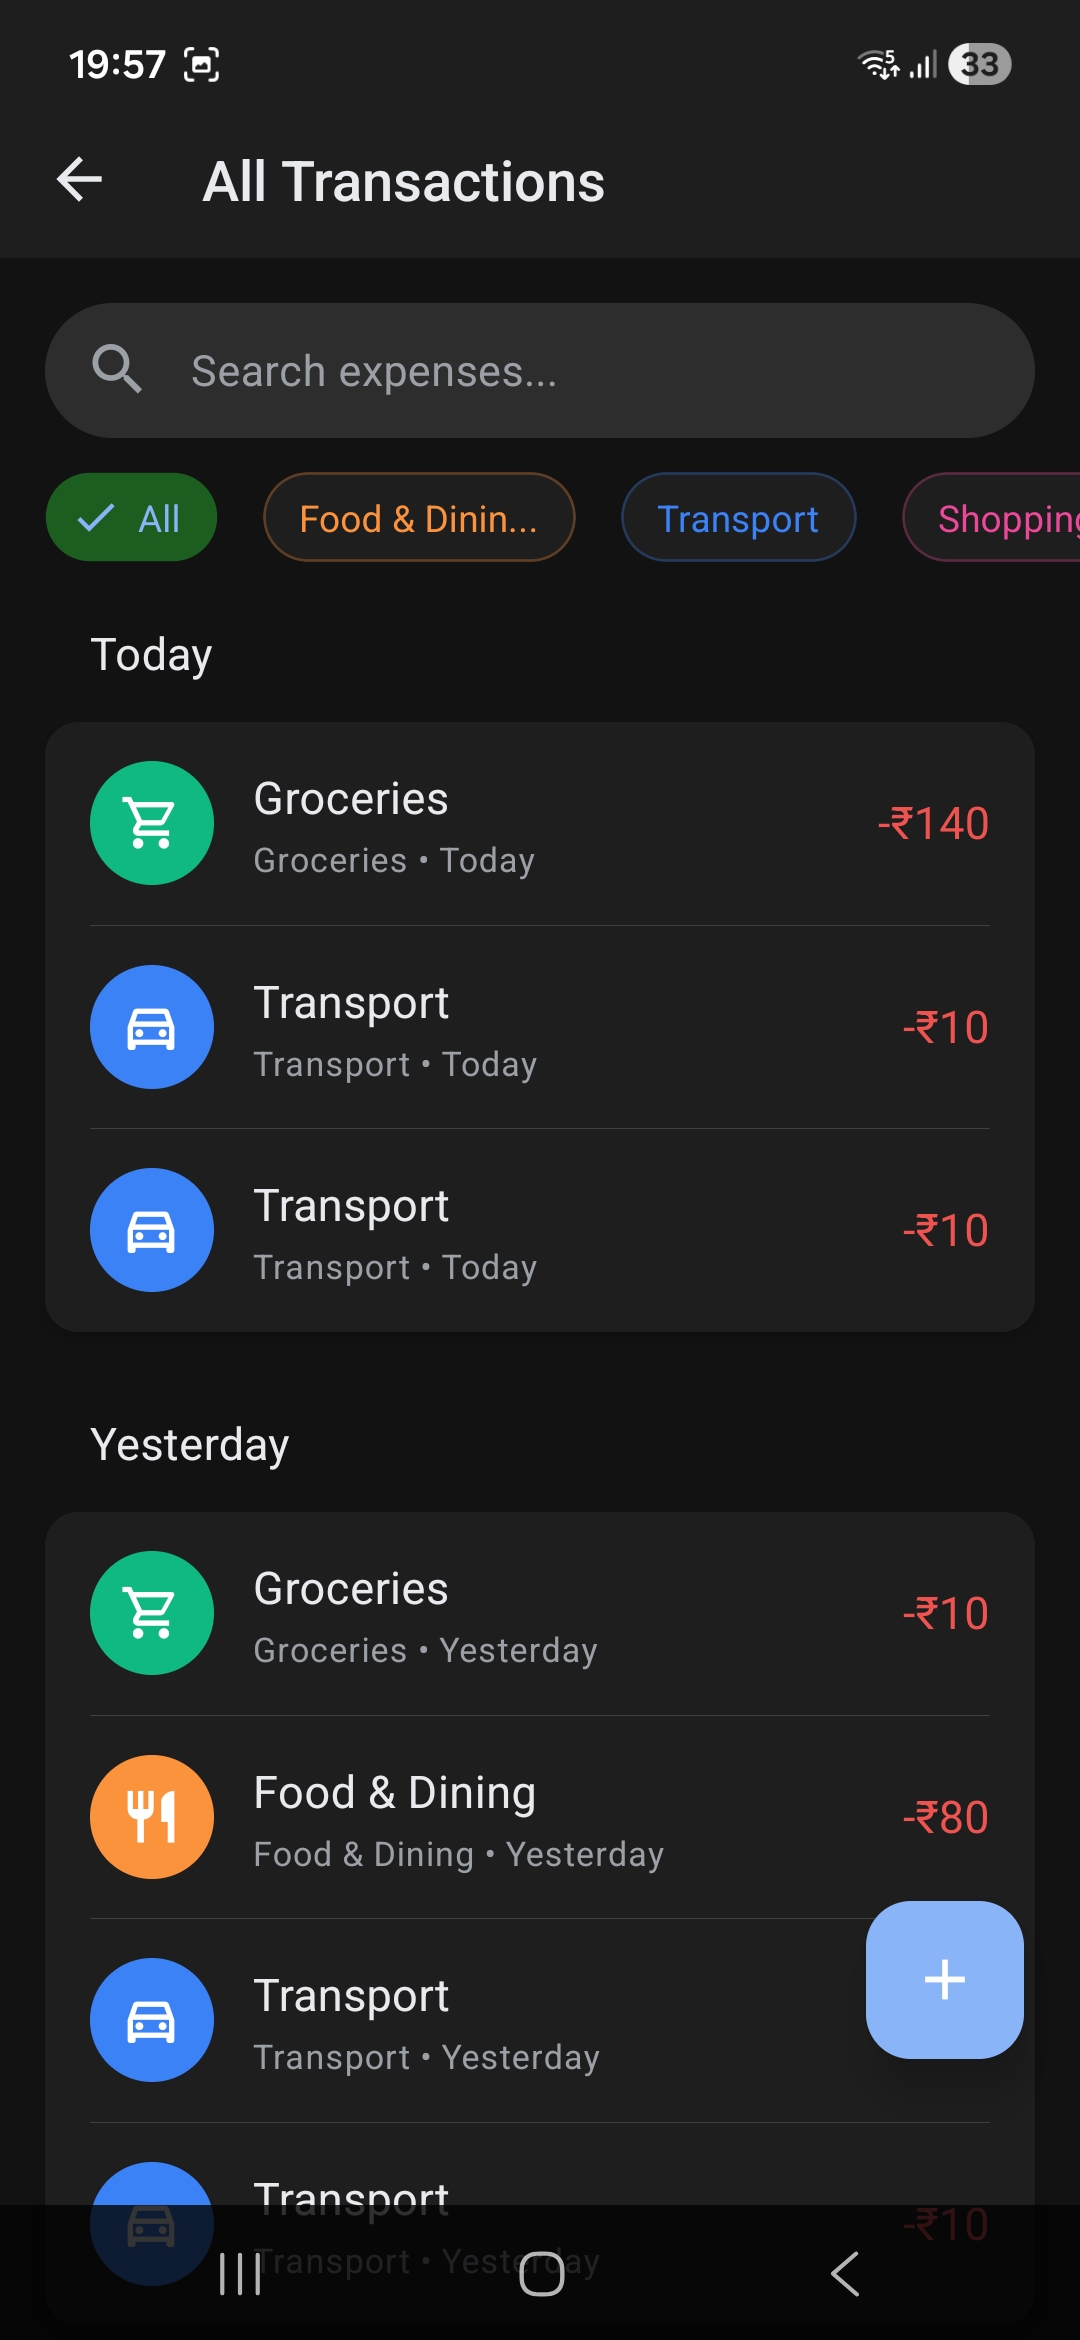
Full chronological list powered by Shopify's Flash List for buttery-smooth scrolling even with thousands of transactions. Scroll through your complete spending history with category icons, amounts, and payment status.
Architecture Deep Dive
State Management: React Context + useReducer
I chose Context + useReducer over Redux or Zustand because I wanted centralized state without extra dependencies. The 587-line AppContext manages everything:
interface AppContextState {
    categories: Category[];
    expenses: Expense[];
    pendingExpense: PendingExpense | null;
    isLoading: boolean;
    isInitialized: boolean;
    themeMode: ThemeMode;
    quickStats: {
        today: ExpenseSummary;
        thisWeek: ExpenseSummary;
        thisMonth: ExpenseSummary;
    } | null;
}
The context exposes typed action methods: addExpense, updateExpense, deleteExpense, addCategory, startPendingExpense, completePendingExpense, cancelPendingExpense, etc.
Performance: React.lazy() + Flash List
Non-critical screens are lazy-loaded to reduce initial bundle load time:
const AnalyticsScreen = React.lazy(() => import('@/screens/AnalyticsScreen'));
const SettingsScreen = React.lazy(() => import('@/screens/SettingsScreen'));
const ExpenseListScreen = React.lazy(() => import('@/screens/ExpenseListScreen'));
Transaction lists use Shopify's FlashList instead of FlatList for consistent 60fps scrolling performance.
AsyncStorage Service Layer
A typed generic service layer wraps AsyncStorage to avoid raw JSON parsing everywhere:
export async function getStorageItem<T>(key: string): Promise<T | null> {
    const json = await AsyncStorage.getItem(key);
    if (!json) return null;
    return JSON.parse(json);
}
Challenges & Complexities
1. Native Android UPI Module
Writing a custom Java native module to bridge upi://pay intents with persistent notifications that emit events back to JavaScript. The module handles:
- UPI intent construction and launch
- Persistent notification with Paid/Failed action buttons
NativeEventEmitterfor status callbacks- Stale pending expense cleanup on app restart
2. OCR Receipt Parsing
Building a reliable parser for GPay transaction screenshots was harder than expected. The OCR output is unstructured text, and different receipt formats (GPay vs PhonePe vs bank apps) have different layouts. I ended up with 5 fallback patterns for amount extraction alone, plus heuristics to distinguish notes from UI labels.
3. Pending Expense State Machine
Managing the lifecycle of a pending UPI expense across app backgrounding, killing, and restart:
startPendingExpense→ creates and persistscompletePendingExpense→ moves to expense list, clears pendingfailPendingExpense→ saves as failed, clears pendingcancelPendingExpense→ discards without savingresumePendingExpense→ checks for stale (>1 hour) pending expenses on app restart
4. Donut Chart Tuning
Getting react-native-gifted-charts to produce polished donut charts took iteration — inner/outer radius ratios, gradient colors, center label components, empty state handling, and keeping smooth animations with dynamic data updates.
5. Code-Splitting in React Native
Using React.lazy() with Suspense in React Native isn't as straightforward as on the web. Each lazy screen needs a Suspense wrapper with a loading fallback, and Metro bundler handles the code-splitting differently than webpack.
Key Takeaways
- Bare React Native CLI gives you superpowers — when you need native modules, don't fight Expo's managed workflow. Go bare.
- OCR + heuristic parsing is fragile but useful — multi-pattern fallbacks with graceful degradation make it work in practice.
- Notification actions are underutilized — they're perfect for async workflows like "did this payment succeed?"
- Offline-first simplifies everything — no loading states, no network errors, no auth flows. Just data in, data out.
- React Context + useReducer scales further than you'd think — for a single-user mobile app, it's more than enough.
Check out the source code on GitHub.